Page Contents
Introduction
Hello friends, in this article I will tell you all the features of the kinemaster app and also I will tell you how to use it properly. The image below is the main interface of the kinemaster app when you first time installs this app and open it then it looks like this.

In the above image, I have given a number to the options now I will describe all the option and its uses.
- This option is for kinemaster asset store you can download Effects, overlay, fonts, music which will help you to edit your video like a pro.
- This option is for video editing. You will start video editing through this option.
- This is the kinemaster app official youtube page link, once you click here you will be redirected to the kinemaster app youtube channel.
- This is the setting menu which will help you to edit kinemaster app setting from here.
- This option is for Help and support.
- with this option, you can directly start a video editing.
Once you click on the settings menu icon, you will see all the setting options like below
Information
- About my account
- About KineMaster
- Device Capability Information
Editing
4. Default Photo Duration5. Default Photo Cropping6. Default Layer Duration7. Media browser full-screen mode8. Audio Browser Full-screen mode
Recording
9. Audio Recording Source
Sorting
10. Sort project list by
File Location
11. Recorded Audio Location
12. Recorded video Location
13. Photos Location
14. Frame Capture Location
Advance
15. Advanced and Experimental Setting
1. About my account
This setting option is for checking your kinemaster account details, its show is you purchase kinemaster pro version or using the free version, and lots of other options like a monthly subscription, annual subscription, enter the license key, Unlock with a promotional code, 30 days pass and all.
2. About KineMaster
This option shows you kinemaster app version details, which version of kinemaster you are using, all the details will show here.
3. Device Capability Information
This option shows you, your mobile capability with kinemaster it also shows you some details about your mobile phone like chipset, model, the Android version of your mobile phone, and its show details about how your phone support editing video and exporting video with kinemaster.
4. Default Photo Duration
This setting option is for selecting the default duration time for your photos, which means when you start a video editing and you select an image how long image will appear in a video this setting will you can change from here.
5.Default Photo Cropping
This setting option is for selecting the default photo cropping option in this option you can get some additional option like fit in the screen, fill the screen, ken burns/crop and pan (random), ken burns /Crop, and pan (Face recognition). when you add an image to edit video then the image will take size which you selecting from above options.means if you select a fit in screen option them an image in the video will appear in full-screen size.
6. Default Layer Duration
This setting option is for selecting the default duration time for your Layer, which means when you start a video editing and you select a Layer how long time Layer will appear in a video this setting will you can change from here. when you select a Default layer duration 6 seconds then all your layer will appear for 6 seconds by default.
7. Media Bowser full-screen mode
With the help of this option, you can change the media browser mode with full-screen, when you enable full-screen media browser mode then the media browser will look like the below image and this setting option is very useful to sorting and finding exact media files which we want in our video.


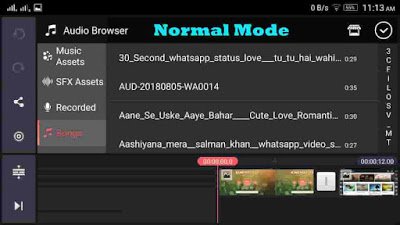
8. Audio Browser Full-screen mode
With the help of this option, you can change the Audio browser mode with full-screen, when you enable full-screen Audio browser mode then the audio browser will look like below image and this setting option is very useful to sorting and finding the exact audio file which we want in our video.

9. Audio Recording Source
This setting option is for selecting an audio recording source from available options.
10. Sort project list by
With the help of this option, you can sort your project list by date edited, date created, and by name when we create lots of projects then this option will help us to arrange or sorting the project list.
11. Recorded Audio Location
This option helps us to select the default location for recorded audio, when we record audio during editing video then this audio file will save in that particular folder which we selected here.
12. Recorded Video Location
Same as the above option, this option is for selecting default Recorded Video Location.
13. Photos Location
This option is for selecting the default Photo location.
14. Frame Capture Location
same as the above three options this option is for selecting default Frame Capture Location.
15. Advance and Experimental Settings
This setting option is for some advanced settings when you open this setting you can enable some additional setting from here like media browser hierarchical mode, show audio amplitude meter when recording video, allow export frame rates higher than 30fps, collect export diagnostic data.
Thank you